Route Planning & Editor
In this area, you manage your lines, import schedule data, and construct complex route paths.
Do not confuse this with Edit Routes! There, drivers only change names. Here, you define geometry, logic, and schedules.
1. Overview & Tools
Open Route Planning in the menu. You will reach the dashboard, which shows you a list of all existing routes.
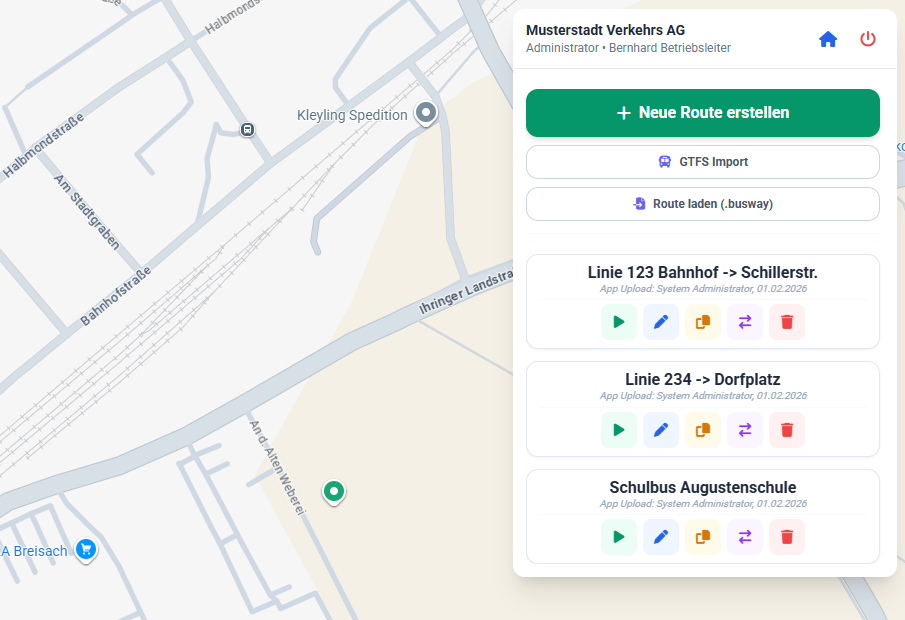
Function Buttons (Tools)
As soon as you select or view a line in the list, colored buttons become available under the name. These control the management of the line:
1. Simulation
Starts a visual run-through of the route.
- Benefit: Check the logical order of stops and exact positioning.
2. Edit (Open Editor)
Loads the route fully into the map editor and zooms to the track.
- This takes you to Geometry Editing (see Section 3).
3. Copy (Duplicate)
Creates an exact copy of the current route (marked as "Copy").
- Construction Site Scenario: Ideal for temporary detours. Copy the original line, adapt the copy to the detour. The original remains unchanged, and the copy can be deleted later.
4. Reverse (Create Return Route)
Reverses the order of all waypoints and stops.
- Benefit: Saves time when creating the return direction.
- Important: Since stops are rarely exactly opposite each other, you usually have to manually move points to the correct side of the street after reversing. The editor automatically handles the re-routing.
5. Delete
Irrevocably removes the route from the system.
2. Data Import & Migration
You don't have to draw every line by hand.
A. GTFS Import (Schedule Data)
Import official line paths from GTFS files.
- Select GTFS Import.
- Upload your file and select the exact Agency and Route.
- Tip: Use our GTFS Extractor for large files.
B. BusWay Free Import (.busway)
Import backup files from the BusWay Free App to migrate your existing routes into the Professional environment.
3. The Route Editor (Map)
As soon as you open the editor, you will see the map and—if available—the current line path. Editing is done intuitively here with the mouse.
Placing New Points
The editor strictly distinguishes between Stops (visible to drivers) and technical Waypoints (invisible to drivers).
A. Set Stop (Left Click)
Click with the left mouse button on any spot on the map (Append enabled) or on the blue line (Append disabled, for insertion).
- Result: An official stop is created immediately.
- Behavior: This appears in the list, is displayed to the driver, and is announced by the system.
B. Expert Functions (Right Click)
A click with the right mouse button opens the context menu for advanced functions. Here you can edit points that control traffic flow but are not passenger stops.
- Set Waypoint:
- Creates an invisible point.
- Benefit: Forces the navigation to take a specific street (routing aid) or serves as a trigger for warnings.
- Audio Cue: In the context menu, you can enter text (e.g., "Caution: School!"). This is announced to the driver as soon as they pass the point.
- Speed Limit:
- Sets a speed limit from this point onwards.
- Select the value (e.g., "30 km/h") or "Lift restriction".
- In the app, the driver sees the corresponding traffic sign symbol from here on.
Moving & Sorting (Drag & Drop)
The system helps you keep order. You can change every point later without having to delete it.
-
Move Geographically: Grab a point (Stop or Waypoint) with the left mouse button and drag it to the new position. The connecting lines recalculate automatically.
- Note: In GEOM mode (see below), you can also grab the small intermediate points (nodes) of the street path to adjust curves with millimeter precision.
-
Sorting ("Snapping"): Do you want to push a new stop between two existing stops?
- Drag the point directly onto the blue line of the route.
- The point is "attracted" by the line (snaps in).
- Automatic: The system detects the new position and automatically sorts the point into the correct place in the stop list.
-
Changing Route Path:
- Press the Shift key. A white point appears on the line.
- Drag the point with the mouse to the desired new route path.
- Upon releasing the mouse button, the entire section between the previous and next stop is recalculated to run via the new point.
Orientation (Synchronization)
For long lines, the map and list work hand in hand to help you keep track:
- Click on Map: Click a point on the map ➔ The list on the right automatically scrolls to the matching entry and highlights it.
- Click on List: Click a name in the list ➔ The map immediately zooms to this point and centers it.
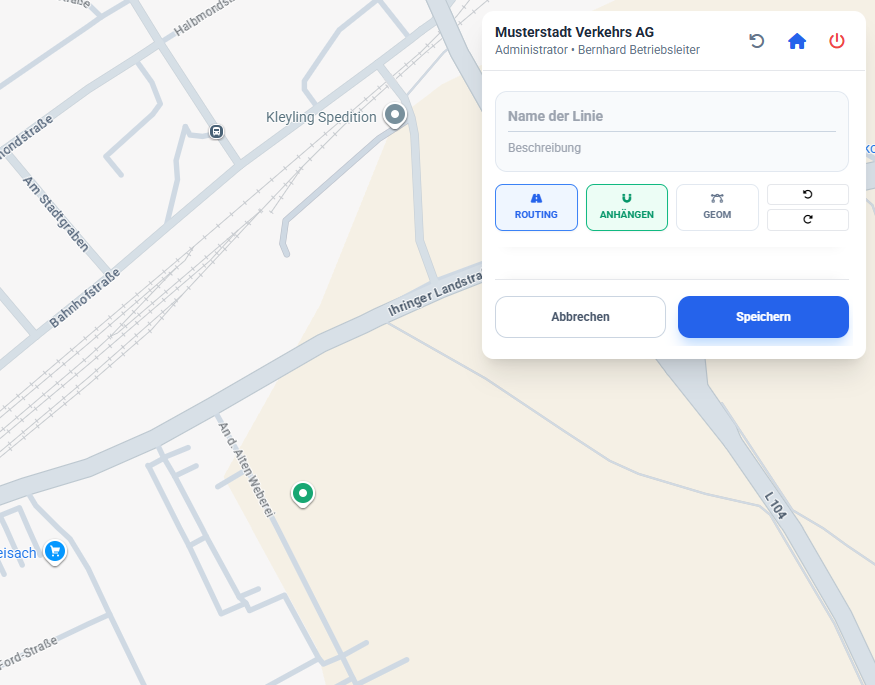
The Toolbar (Top Right)
These four switches define how the editor behaves when clicking.
-
1. ROUTING (Automatic Road Following)
- Blue (On): The editor follows the road network (like a sat-nav).
- White (Off): Draws a direct straight line to the next point. Important for depots or unmapped private roads.
-
2. APPEND (Insert Mode)
- Blue (On): Every click on the map adds the new point to the very end of the line. (Standard when drawing a new route).
- White (Off): The new point is inserted into the line at the current cursor position. Ideal for subsequently building points or stops into the middle of a route.
-
3. GEOM (Geometry Fine-Tuning)
- Displays all technical intermediate points (Nodes) on the blue line.
- You can move these small points individually to manually correct the road path (e.g., if the map is inaccurate).
-
4. Undo/Redo (Arrows)
- Undoes the last step or restores it.
4. Saving
Changes in the editor only take effect when you click Save at the bottom right. The data is transferred to the cloud immediately.